Since deploying PiHole on my home network a few months ago, I have found that the network response on my devices seem to be faster (probably due to the PiHole cache). I was also very pleased to find that approximately 16% of my DNS queries are blocked according to my configured block lists. Next step in the evolution of my secure home network is configuring secure DNS (DNSSEC) and DNS over HTTPS.
I will not cover the installation and setup for PiHole in this big post but I will share the configuration steps for setting up DNSSEC and DNS over HTTPS. My upstream DNS provider, Cloudflare, does support DNSSSEC. But what exactly is DNSSEC. “The Domain Name System Security Extensions (DNSSEC) is a suite of Internet Engineering Task Force (IETF) specifications for securing certain kinds of information provided by the Domain Name System (DNS) as used on Internet Protocol (IP) networks. It is a set of extensions to DNS which provide to DNS clients (resolvers) cryptographic authentication of DNS data, authenticated denial of existence, and data integrity, but not availability or confidentiality (Wikipedia)”.
DNS over HTTPS (DoH), on the other hand, is “a protocol for performing remote Domain Name System (DNS) resolution via the HTTPS protocol (Wikipedia)”. The objective of implementing these two protocols is end to end security for DNS queries. Historically, DNS is a clear text protocol but DNS over HPPTS adds the missing security by encrypting the DNS queries using the HTTPS protocol.
Cloudflare for Teams
Most will be familiar with the additional security services and features offered by other providers such as OpenDNS. Similarly, Cloudflare offers similar services with their free Cloudflare for Team offering. You will need an account for this configuration. The signup and setup is simple. Once completed, make note of your unique DNS over HTTPS URL as you will need this later in the setup.
Raspberry Pi setup
As mentioned previously, I will not be covering the setup and configuration of PiHole on Raspberry Pi. Therefore, assuming that PiHole is already setup and configured on your Raspberry, it is important that your Raspberry has a static IP address. Edit /etc/dhcpcd.conf to set your static IP. Your configuration should be similar to:

Next, restart the service with sudo /etc/init.d/dhcpcd restart and verify your settings with ip addr show dev eth0. Next, we need a service that will act as the proxy to forward all DNS queries from PiHole to my upstream DNS provider (Cloudflare). For this configuration, I am using dnscrypt-proxy. The latest available version as at the date of this post is version 2.0.45. The installation steps are:
wget https://github.com/DNSCrypt/dnscrypt-proxy/releases/download/2.0.45/dnscrypt-proxy-linux_arm-2.0.45.tar.gz
tar -xf dnscrypt-proxy-linux_arm-2.0.45.tar.gz
mv linux-arm dnscrypt-proxy
cd dnscrypt-proxy
cp example-dnscrypt-proxy.toml dnscrypt-proxy.toml
At this point, you will need your custom DNS over HTTPS URL that was was provided with you setup your Cloudflare for Team account. Head over to the Online DNS Stamp Creator site provided by the folks at dnscrypt. Select “DNS over HTTP (DoH)” as your protocol and enter the FQDN for your Cloudflare URL host (i.e. if your custom URL is https://hja7jksjadl.cloudflare-gateway.com/dns-query the the host name is hja7jksjadl.cloudflare-gateway.com). A “Stamp” is required to secure your Cloudflare configuration details. Your screen should look similar to:
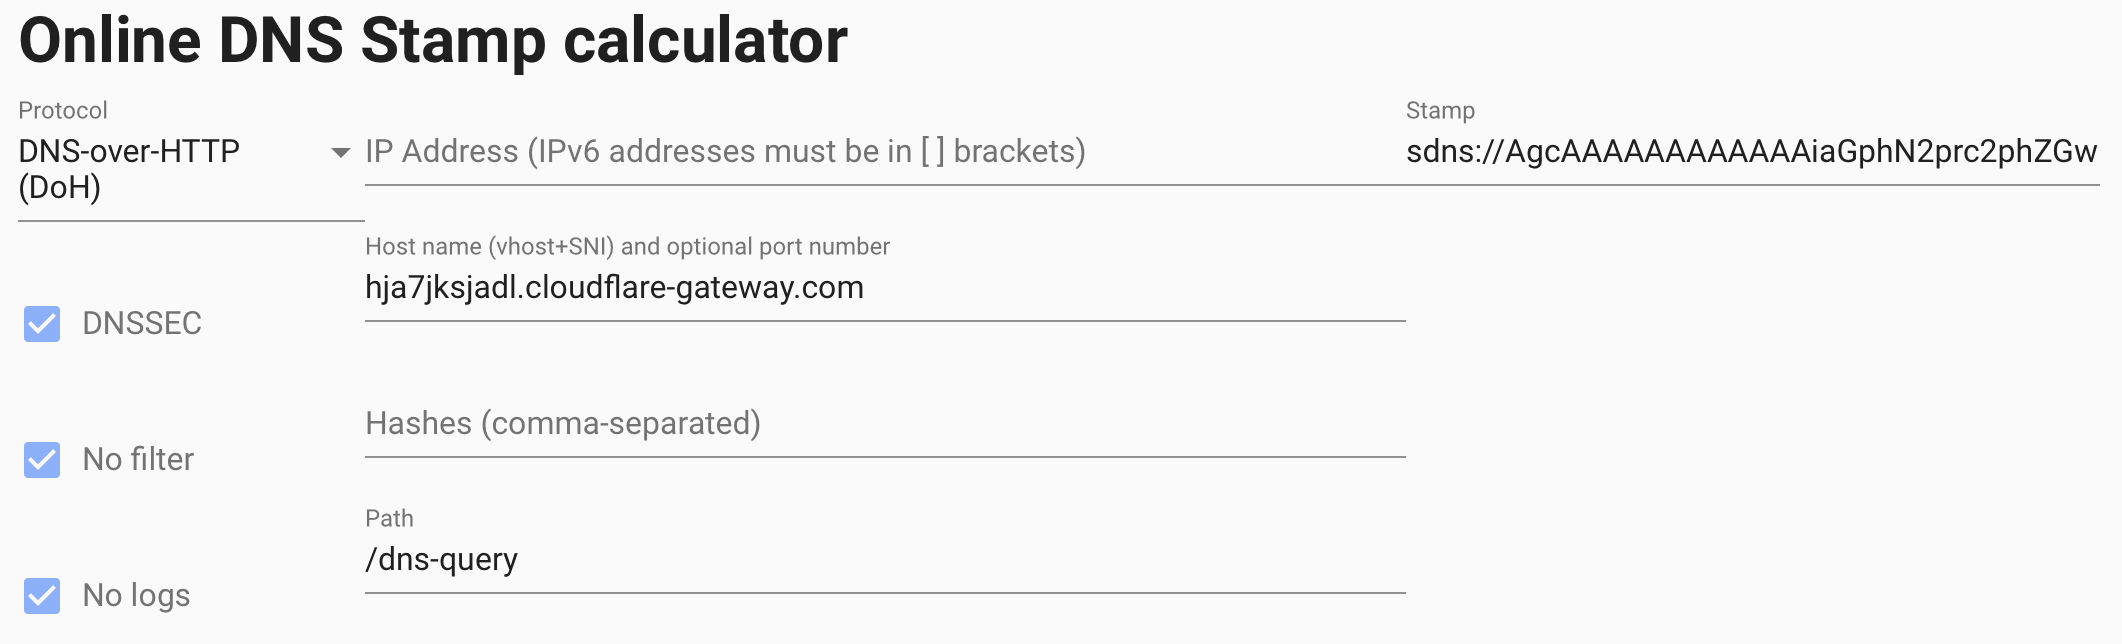
Make a note of the stamp. Next, edit file dnscrypt-proxy.toml as follows:
Set server_names = [‘gateway’]
Set listen_addresses = [‘127.0.0.1:5054’]
Set fallback_resolvers = [‘1.1.1.1:53’, ‘1.0.0.1:53’]
Set cache = false
Uncomment the last two lines in the file after the [static] section.
Change [static.’myserver’] to [static.’gateway’]
Replace the default stamp with the stamp created above.
Install dnscrypt-proxy as a service:
sudo ./dnscrypt-proxy -service install
Start the service:
sudo ./dnscrypt-proxy -service start
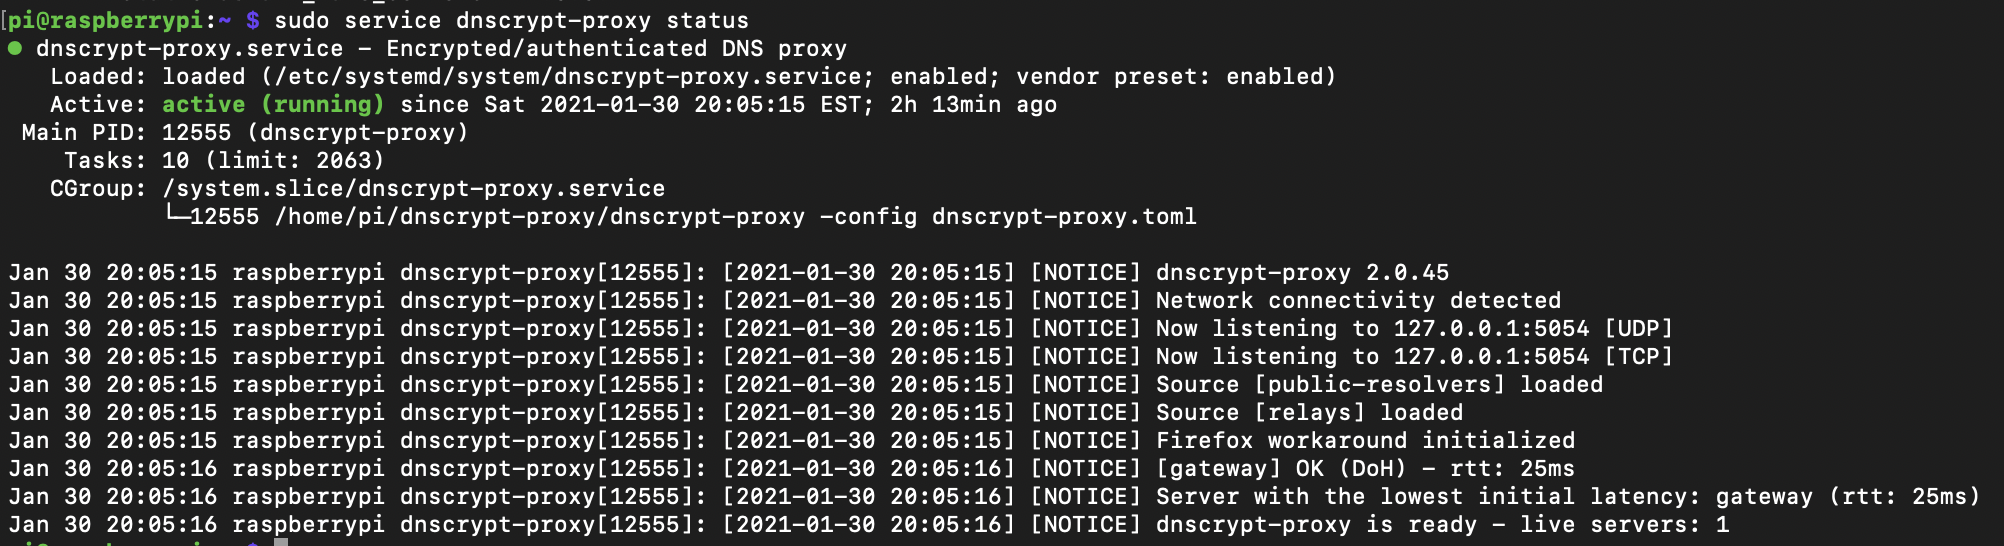
If all went well, you can confirm that the service is running and configured correctly with sudo service dnscrypt-proxy status:
Confirm that the service is listening on configured port 5054 with netstat -an | grep 5054:

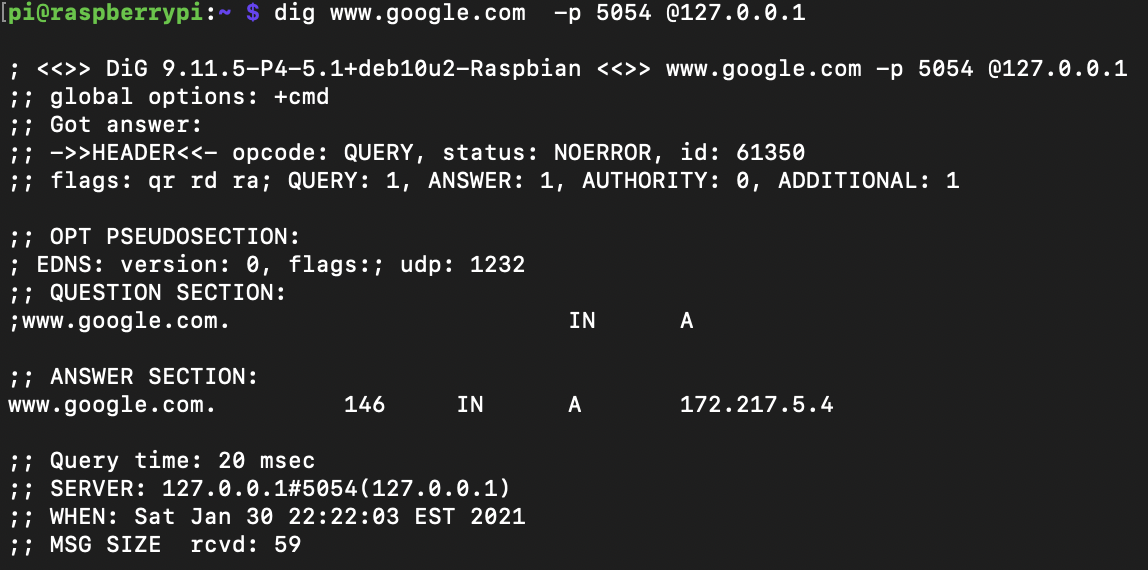
Confirm that DNS queries to the upstream provider (Cloudflare) is working correctly on port 5054:
Finally, configure PiHole to set the dnscrypt-proxy service as the upstream DNS provider. Navigate to your PiHole settings –> DNS and add 127.0.0.1#5054 as a custom upstream DNS server and save. Ensure that you deselect any other upstream DNS providers that may have been selected previously. That’s it!
Not really. The final step is to setup your DHCP server to assign PiHole (IP address or FQDN) as your primary DNS server. That way, you ensure that all DNS requests from your network hosts are routed to PiHole and securely to Cloudflare via the dnscrypt-proxy service. Your security profile can be fine tuned by editing your policies in the Cloudflare for Team console.
Final thoughts
I did test this configuration running PiHole and Cloudflared in Docker, however, I found that Cloudflared was not very reliable in Docker. Conversely, this Raspberry Pi configuration running PiHole and dnscrypt-proxy is rock solid and reliable. It’s sort of like having a dedicated hardware security appliance protecting my network. This project is well worth the investment.